Showing posts with label DIY. Show all posts

Wednesday, April 23, 2014

Curly Hair Tips


I got difficult hair. Not as difficult as it could be, but difficult none the less.
It's short, curly, frizzy. Not an equation for easy hair days.
disclaimer: i'm not a hair stylist, just a girl with curly hair. 

Basic curl tips I live by:
-Don't use shampoo often. (2-3 times a week)
As my hair's a bit dry, stripping it of natural oils isn't a great idea.
-Pat dry with a cotton tee, instead of a wrapping it up with a towel.
This will help prevent breakage and frizz
-Argan oil, Argan oil, Argan oil & blow out serum. I'm a big holistix fan.
(or Moroccan oil.) Helps prevent breakage and frizz, protects from heat. Increases shine. and is amazing.


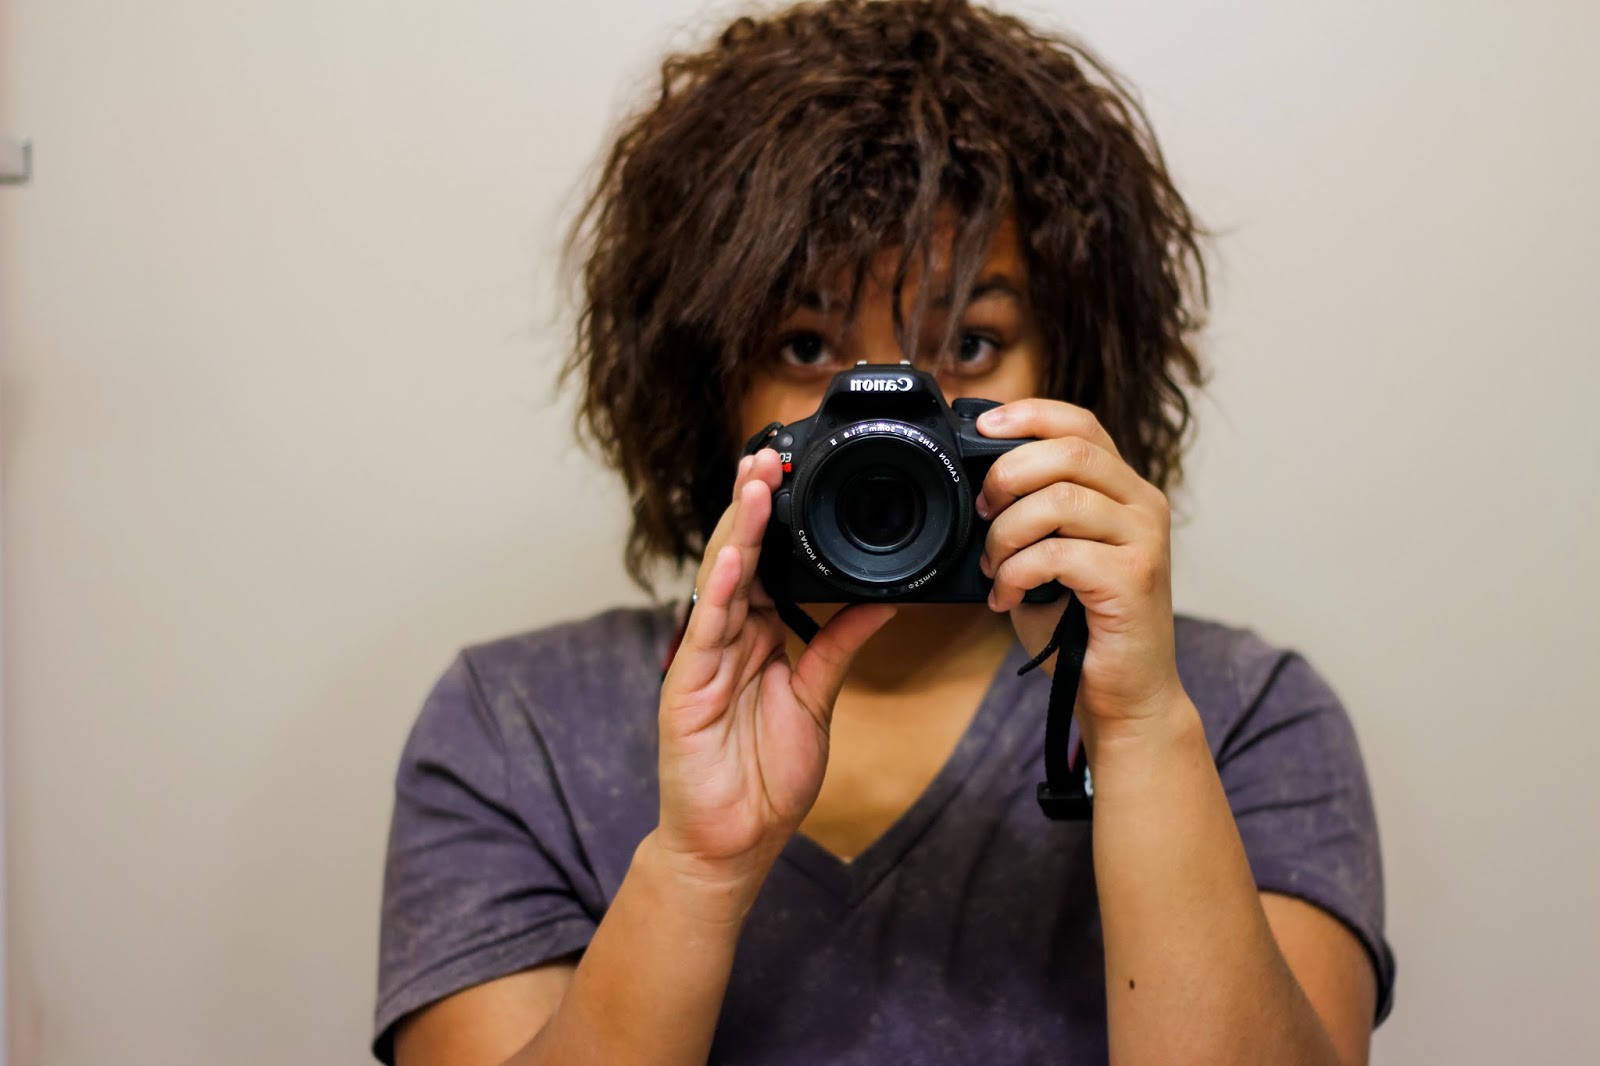
I use two tools when I style my hair curly; a diffuser and a very thin straightner.
the thinner the straighter, the tighter curls you can m(f)ake.
you can see how little it is in my hand


Here's my hair after I've blow dried it.
It's all over the place I got a lot of pieces on top that stay straight or go real frizzy.
but as you can see a lot of my hair is real curly.


With my little straightener I can take frizzy pieces and put the curly back in.


I find use the little straightener helps me smooth out frizz,
and get a bit more control over the style and shape of my hair. 


Monday, April 21, 2014

DIY Stamped wrapping paper

I'm obsessed with black and gold.
They are 2 out of the 5 colors  I wear.

So when black and gold became the theme for my friends birthday party,
a million ideas ran through my head and this was one of them.
It's an easy way to add a personal touch to little presents and is way too easy. 

(I also made a metallic gold cake, but that will have to wait for another day.)
again...this is the easiest. so pin away and share with ya friends. 

Supplies: brown wrapping paper, paint, a plate, and a round sponge brush. 

add paint to you're plate and stamp away.
because of the nature of my colors, i didn't wash my brush in between, but you may need to. 

wait for it to dry

wrap away & top with ribbbon, embroidery thread, or pretty trim. 

as it turns out, wrapping cylindrical things that are no where equal in size in the same present is hard. 


also. missy's present had the prettiest packaging. anthro never dissapoints. 


go be lovely guys. 

Sunday, March 16, 2014

DIY 30 Minute Spring Wreath

Spring is my favorite season. All about a fresh start and beauty emerging from a barren winter.
I love it a lot. Anyways, I found some florals in the crafty corner of my room yesterday and a spontaneous craft flowed from my finger tips, that is this wreath. It was such a quick easy way to add some "spring fever" to my bedroom.

supplies: wire cutters, (i realize those are not wire cutters, but i couldn't find mine, so pliers are subbing in photo wise) floral tape, wire, and florals (make sure your florals are wire based). I found all of my supplies at my local hobby lobby. The 2 stems in the floral section, and the smaller flowers in the scrapbook section.

 1. Lay out and bend your stems into a wreath (circle) shape.

2. With your wire,  wrap your stems together and then cover them with floral tape.

3. Once you're two pieces of greenery are wired and taped, you can add your flowers! I thought the wire in my longer flowers, would be enough...but it was not! So I wrapped them in the wire that I have, and then floral tape before I added them to my wreath!

4. Add your flowers til you're happy with the look of your wreath.

5. Hang it up and be cute.


Happy Monday and Happy St. Patricks day.

-rachel 


Monday, December 16, 2013

Christmas in a Jar

Inspiration from Deer Circus has led me to make a DIY snow globe.
You can read her post here.
It's the simplest cutest way to spruce up your home for Christmas.
Pun intended.

I got my tree, mini lights, snow, and fencing from Hobby Lobby.
The mason jar came from my momma's kitchen.

Happy Monday.

xo, Rach


Thursday, November 21, 2013

Oh, thanks.

Thanksgiving is in ONE week.
Is that a real thing? I think not.
time is FLYING by. It's insane.
p.s. i made this free printable last year if you want one.

Anyways, I'm wildly excited. 
I love food, family time, and not working is good also.
Obviously a thankful heart is something we should always have.
But it's November is always a nice reminder.

I'm also just really excited to eat pie.
...k bye.

Etsy: 
Photo:


Tuesday, May 14, 2013

DIY Studded Muscle Tee.

Muscle tee's are the greatest.
For me? They are a stylish way to be so comfy all the time. 
I went to buy one at the mall, and it was 25$

and I said I can make this for 5$ and so I did.
Supplies: 
Tshirt: 3$ (i got mine from the thrift store)
Studs: 6$ (for a pack of 20)
Scissors


1. Find a graphic tee. Scour your local thrift store, or brotherly closet. 

2. Cut along the dotted lines

 2. Measure out where you want your studs,
poke the prongs through the fabric and press them down on the other side.

4. Be hardcore. 


Happy tuesday guys!

xo, rach


Saturday, March 23, 2013

Floral Crown

I've seen them on pinterest too much.
And everytime I see one?
I think I do a crafty sigh for how whimsical and pretty they are.
I finally made one.

I'm not doing a full DIY because they're are 100 out there.
(I used this one.)

You'll need...


1. Make your floral hoop, I twisted 5 pieces of wire together, so it was sturdy.

2. Cut the blooms and attach with wire, wrap the wire with floral tape...and repeat, repeat.

3. Be all cutesy and what not.

here's what i ended up with. im in love. 


While I don't think I could pull this off day to day, I am too excited to use it in photo shoots to come.

xo, rach

Thursday, March 14, 2013

DIY Vintage Light Switch Plate

I met up with my fellow blogger friends Arielle and Brittney
We decided to do a craft, and through pinterest inspiration, this is what we did!


Before & After


1. First find a pretty plate(s). We got ours, under a dollar each, at thrift stores like D.I. and savers!


2. Triple bag them up? and slam them on the concrete. I was so nervous for this step, just because the plates even sliding in the car was sending chills in my spine. But it was easier, and a lot more fun then I thought it'd be!

3. We laid down our china pieces in a pan, for easy sorting, and picked out the pieces we wanted to use! (obviously, be carefully not to cut yourself up)

4. Next, lay down a patter then glue away. We used hot glue, but a few of my pieces have already been bumped off...so I say SUPER GLUE! :) 

here are the final results. 


xo, rach


Saturday, February 23, 2013

"I am mine" Tshirt

One day a long time ago I  did a post featuring a song by Brooke Waggoner called "I am mine."

This song...I'm wildly obsessed with it.
I listen to it at least every other day.
It's one of those songs that just fills me up,
and makes me feel...understood.
(does anyone have a grater, cause i have cheese.)
but seriously. i love it.
so much, that i made a tshirt.


Materials:

T shirt
Freezer Paper
Fabric Paint
Iron
Exacto Knife (or major scissor skills)
A paint brush (I used a small sponge brush)


1. First draw, or trace your design onto your freezer paper.
2. Cut out the design with your exacto knife
3. Iron the freezer paper down onto your t shirt
(and put something between your shirt, so the paint doesn't bleed through)
4. Paint it in. Let it dry.
5. Pull of the freezer paper & be awesome


xo, rach


Wednesday, February 6, 2013

DIY heart clip

I'm finding it so hard to jump into the holiday spirit.
but I'm really trying. So I made something.
It's the easiest thing you'll ever do. And I hope you like it. :)


Supplies:
Leather (or fake leather bags from the D.I.)
Scissors
Bobby pin
Hot glue

1. Cut out some heart shapes (I cut out 4, two red and two pink.)

2. Hot glue your hearts together

3. Glue your string of hearts to a bobby pin

4. Wear it up


Easy peasy right? Try it. I dare you ;)

xo, rach


Related Posts Plugin for WordPress, Blogger...