I know it's not even thanksgiving yet, but I'm so excited for Christmas.
Secretly I've been listening to the Relient K Christmas cd a lot. (let it snow baby, let it reindeer)
I recommend it if you want a change of pace in your holiday tunes.
Anyways....
I've been experimenting with Christmas card templates lately,
and through some steps I made these Christmas trees.
It takes a few steps, but they're so cute, if I do say so myself.
As usual, I hope it all makes sense. :)
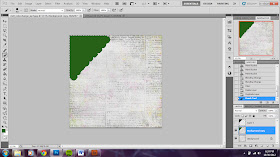
1. Select a large patterned image to use the base of your tree.
2. Select a hard round brush. Change the size to your liking, and change the spacing to 80%.
3. Create a new layer, and drag your brush along the corner of your image..
3. and then fill in the rest
4. Select your corner by pressing ctrl + the layer
5. Hide your black corner layer, copy the background layer, and fill with a green paint.

6. Change the layer blending mode from normal to linear burn.
(i've also had good results with the options color, and hue.)
7. Merge the background layer's and then copy and paste the corner onto a new file.
8. Adjust the size, and the angle
9. Copy the layer as many times as you'd like,
and layer them in such a way that they lay on top of each other.
10. From another file copy and paste a rectangle for the trunk of your tree.
11. Using the polygon tool, make a star. Copy and paste it.
(I used the same file as my trunk and just added paint filled in yellow, and lowered the opacity)
xo, rach
p.s. don't hesitate to comment, or email with questions.


I love your new blog design!! It is SO cute! I have noticed you strive for great spelling and grammar and I thought this might help ya. I always used to misuse the apostrophe, but luckily The Oatmeal set me straight ;)
ReplyDeletehttp://theoatmeal.com/comics/apostrophe
love ya girrrrrl
Ha you are right while crafting is my skill grammar is not. Ha thanks for the !
Delete